Introducing MV-C: A Unity-Specific Design Pattern
Last year I introduced a Unity-based model-view-controller (MVC) design pattern and in the many comments on that article, a theme arose. The “model” part of MVC is arguably not necessary since Unity stores so much of the data itself. Today’s article takes that theme and elaborates on it to create and introduce a new Unity-specific design pattern. Read on to see how this adaptation of MVC works!
The MVC pattern described in the last article looks like this:
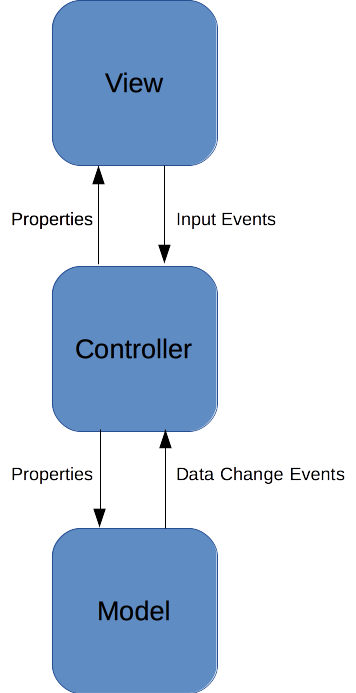
The view is a MonoBehaviour whose responsibilities are input (e.g. buttons, touch) and output (e.g. graphics, sound). Input is exposed by events. Output is by functions. The view performs no logic such as AI or scoring points.
The model is not a MonoBehaviour. It’s responsible for storing the data representation of the object, such as position and health. It allows access to this data by properties and dispatches events when the data changes. It also performs most of the logic, hence the phrase “fat models, skinny controllers.”
That leads us to the controller, which is also not a MonoBehaviour. It’s the middle-man between the model and the view. It listens for input from the view and updates the model accordingly. It listens for data changes from the model and outputs using the view.
Some readers of this pattern found it strange that the model would store data such as an enemy’s position because Unity is already storing this in the game object’s Transform. Why store it twice and go through the trouble of synchronizing it between the view and the model? That’s a fair critique of the MVC pattern as described in the last article. It’s also the reason for today’s new design.
Here’s how the MV-C pattern looks:
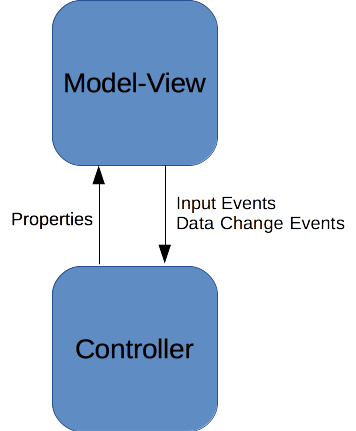
The model and the view have merged into a model-view, hence the name “MV-C”. It’s a MonoBehaviour that handles input and output as well as the data representation of the object. Unlike the models of MVC, it doesn’t perform any logic.
The controller now listens for input from the model-view and updates the model-view accordingly. This may seem strange, but the controller is now performing the logic that should occur due to that input. So it’s not just passing through the input for the model to handle it anymore, but instead handling the input itself. Likewise, it listens for data changes from the model-view, performs logic on those changes, and outputs using the model-view.
Now let’s see this pattern in action. Again we’ll implement a simple enemy, but with a couple of changes. First up is IEnemyModelView, the interface that the controller uses to access the model-view, and some associated event classes:
using System;

using UnityEngine;

// Interface for the model-view
public interface IEnemyModelView
{
	// Dispatched when the health changes
	event EventHandler<EnemyHealthChangedEventArgs> OnHealthChanged;

	// Dispatched when the position changes
	event EventHandler<EnemyPositionChangedEventArgs> OnPositionChanged;

	// Dispatched when the enemy is clicked
	event EventHandler<EnemyClickedEventArgs> OnClicked;

	// Position of the enemy
	Vector3 Position { get; set; }

	// Health of the enemy
	float Health { get; set; }

	// Destroy the enemy
	void Destroy();
}

public class EnemyClickedEventArgs : EventArgs
{
}

public class EnemyHealthChangedEventArgs : EventArgs
{
	public float Health { get; private set; }

	public EnemyHealthChangedEventArgs(float health)
	{
		Health = health;
	}
}

public class EnemyPositionChangedEventArgs : EventArgs
{
	public Vector3 Position { get; protected set; }

	public EnemyPositionChangedEventArgs(Vector3 position)
	{
		Position = position;
	}
}
Remember that the three parts of the model-view are input, output, and data representation. Events like OnClicked are for input. Setters like the one the Position property has are for output. Properties like Health are for the data representation.
Now let’s see how the model-view is implemented as a MonoBehaviour:
using System;

using UnityEngine;

// The combined model (data representation) and view (input and output) for an enemy. Does no logic.
public class EnemyModelView : MonoBehaviour, IEnemyModelView
{
	// Data events
	public event EventHandler<EnemyHealthChangedEventArgs> OnHealthChanged = (s, e) => {};
	public event EventHandler<EnemyPositionChangedEventArgs> OnPositionChanged = (s, e) => {};

	// Input events
	public event EventHandler<EnemyClickedEventArgs> OnClicked = (s, e) => {};

	// Data stored by the model-view
	// Outputs the data by mapping it to the material color
	private float health;
	public float Health
	{
		get { return health; }
		set
		{
			if (value != health)
			{
				health = value;
				GetComponent<Renderer>().material.color = Color.Lerp(Color.red, Color.green, value);
				OnHealthChanged(this, new EnemyHealthChangedEventArgs(health));
			}
		}
	}

	// Wrapper for data already stored by Unity
	// Outputs the data by direct pass-through: no logic
	public Vector3 Position
	{
		get { return transform.position; }
		set
		{
			if (value != transform.position)
			{
				transform.position = value;
				OnPositionChanged(this, new EnemyPositionChangedEventArgs(value));
			}
		}
	}

	// Default values can be set where appropriate
	void Awake()
	{
		Health = 1;
	}

	// Handle input by dispatching an event, not performing logic
	void Update()
	{
		if (Input.GetMouseButtonDown(0))
		{
			var ray = Camera.main.ScreenPointToRay(Input.mousePosition);
			RaycastHit hit;
			if (Physics.Raycast(ray, out hit) && hit.transform == transform)
			{
				OnClicked(this, new EnemyClickedEventArgs());
			}
		}
	}

	// Destroy the enemy, but we don't know why
	public void Destroy()
	{
		Destroy(gameObject);
	}
}
Everything here is a very straightforward implementation. The model-view takes care of details, such as how to know when the player clicks on the enemy and how to render health. You can optionally move the code that maps health to a color from the model-view to the controller and add a set Color property to the model-view for the controller to call. Some will prefer to keep all the logic in the controller while others will prefer to keep rendering-specific code in the view. There are pros and cons to both approaches, so the above code shows how you’d do it in the model-view.
One thing to notice here is that the model-view doesn’t have an explicit reference to the controller. It doesn’t know which class is taking care of the logic. It just knows that input happened so it should dispatch an event, the output functions and set properties got called so it should render something, and which data makes up an enemy. That includes data that Unity is already storing, like transform.position. Most important is that absolutely no logic appears in this class except input handling and rendering.
Next up is the EnemyController:
// The logic for an enemy. Relies on a model-view to store the data representation, gather input,
// and output to the user.
public class EnemyController
{
	private readonly IEnemyModelView modelView;
	private float clickDamage;

	public EnemyController(IEnemyModelView modelView, float clickDamage)
	{
		this.modelView = modelView;
		this.clickDamage = clickDamage;

		// Listen to input from the model-view
		modelView.OnClicked += HandleClicked;

		// Listen to changes in the model-view's data
		modelView.OnHealthChanged += HandleHealthChanged;
	}

	private void HandleClicked(object sender, EnemyClickedEventArgs e)
	{
		// Perform logic as a result of this input
		// Here it's just a simple calculation to damage the enemy by reducing its health
		// Update the model-view's data representation accordingly if this is the case
		modelView.Health -= clickDamage;
	}

	private void HandleHealthChanged(object sender, EnemyHealthChangedEventArgs e)
	{
		// Perform logic as a result of this data change
		// Here it's just a simple rule that an enemy with no health is dead and gets destroyed
		// Output to the model-view accordingly if this is the case
		if (e.Health <= 0)
		{
			modelView.Destroy();
		}
	}
}
Notice that the controller isn’t a MonoBehaviour, nor does it reference one. It uses the model-view via the IEnemyModelView interface. We’ll see why this is important soon.
The next thing to notice is that the controller doesn’t store any of the data for the enemy: health or position. It uses the model-view for that. It also uses the model-view’s events to listen for input and changes in the data representation. It performs all the logic of (very simple) damage calculation and enforces the game rule that when an enemy runs out of health it dies. It uses the model-view to output the results of the damage calculations and to make the enemy die.
Now let’s see some code that uses MV-C:
using System;

using UnityEngine;

public class TestScript : MonoBehaviour
{
	void Awake()
	{
		// Create the model-view
		var prefab = Resources.Load<GameObject>("Enemy");
		var instance = Instantiate(prefab);
		var modelView = instance.GetComponent<IEnemyModelView>();
		modelView.Position = new Vector3(1, 2, 3);

		// Create the controller
		// No need to keep a reference because the model-view already has at least one
		new EnemyController(modelView, 0.25f);
	}
}
In this case the model-view is just a MonoBehaviour on a prefab. I used Resources.Load, but you could get it out of the scene just as easily. To hook up the controller you just need a one-liner to instantiate it and give it a reference to the model-view. You don’t even need to keep a reference to it since the model-view implicitly has references to it via event handlers that the controller adds in its constructor. When the game object is destroyed, both the model-view and the controller will be garbage-collected.
That’s it for the runtime code! However, one big advantage of this approach is that it makes it very easy to unit test all of your logic. All the logic is in the controller, so you really just need to make a fake model-view class implementing the model-view’s interface and give it to your controller. NSubstitute, which comes with Unity Test Tools, includes that along with the NUnit testing framework.
Let’s look at just a couple of tests for the very simple enemy controller above:
using NSubstitute;
using NUnit.Framework;

#pragma warning disable 0168, 0219 // unused variables

// Class with tests
[TestFixture]
public class TestEnemyController
{
	// A single test
	[Test]
	public void ReducesHealthByClickDamageWhenClicked()
	{
		// Make a fake model-view and give it to a real controller
		var modelView = Substitute.For<IEnemyModelView>();
		modelView.Health = 1;
		var controller = new EnemyController(modelView, 0.25f);

		// Fake the OnClicked event
		modelView.OnClicked += Raise.EventWith(new EnemyClickedEventArgs());

		// Make sure the controller damaged the enemy
		Assert.That(modelView.Health, Is.EqualTo(0.75f).Within(0.001f));
	}

	// Three tests in one. Specify parameters for each run of this function.
	[TestCase(0.1f,  0)]
	[TestCase(0,     1)]
	[TestCase(-0.1f, 1)]
	public void OnlyDestroysWhenHealthChangesToLessThanOrEqualToZero(
		float health,
		int numDestroyCalls
	)
	{
		// Make a fake model-view and give it to a real controller
		var modelView = Substitute.For<IEnemyModelView>();
		modelView.Health = 1;
		var controller = new EnemyController(modelView, 0.25f);

		// Fake the OnHealthChanged event
		modelView.OnHealthChanged += Raise.EventWith(new EnemyHealthChangedEventArgs(health));

		// Make sure the controller called Destroy() the right number of times
		modelView.Received(numDestroyCalls).Destroy();
	}
}
If you want to try out this example, including the unit tests, check out the GitHub project.
That wraps up today’s introduction of the MV-C design pattern. What do you think of it? Let me know in the comments!
#1 by Valerie on October 17th, 2016 ·
Thanks for the excellent article Jackson. This new “MV-C” approach is much more Unity-friendly and already I can see a number of benefits. I don’t have any questions for you yet, but I’m sure as I start to implement this pattern that might change. Thanks for including that bit on testing as well as the github project…
You are the man!
#2 by bambam on October 19th, 2016 ·
ty ! i live in korea, i Love u
#3 by Kamil on October 20th, 2016 ·
Nice one! This article got me excited :) I was working on the previous MVC architecture for the past 2 weeks and I must say that putting Model into MonoBehaviour makes things a lot easier.
– Unity already stores some of the data in components so no point to duplicate it and sync it (like author said in the article)
– You can easly see the data in the Inspector/Debug without writing additional wrapper
– It makes inheritance easier (less classes/interfaces to inherit from)
– More Unity friendly
– Less writing so faster development in general
I wanted to put Model into View when I encountered first difficulties but the architecture was still new to me and I wanted to improve my programming skills. Now when I see it from the person that was the source of the first MVC pattern makes this new approach more reliable to me. It kind of allows me to put Model into View hehe :)
Previous MVC solution is also good but it unnecessarily complicates the architecture. It seems a bit like overdoing stuff for the art of MVC. If simpler MV-C allows me to do unit tests im fine with that.
I guess I will spend the day to put my Models into Views :P Cheers!
#4 by Valentin on November 3rd, 2016 ·
Traditional MVC was designed to decouple logic, presentation and data, so you could have several different representations of the same data captured by the Model. I understand merging Views and Controllers but merging Model and View doesn’t make sense to me.
This way you can’t have two views “showing” the same data. Are you sure that you are trying to solve the right problem here? Having position on an enemy GameObject (View) is not data duplication, it is the View setting its position according to the Model.
Imagine you have a Model with a set of players on a map. One View would be in 3D and another would be a 2D minimap. Both are DISPLAYING data, not duplicating positions.
#5 by jackson on November 3rd, 2016 ·
These are all excellent points! If you think of the model as the definitive position of the object and the view as having an interpretation of that position, then there’s no duplication since they’re not always the same. That would allow for multiple views of a single model, which is an advantage of MVC over MV-C.
I like to think of MV-C as a sort of “lite” version of MVC. It’s less flexible than MVC since it merges the model and the view, but it’s also simpler. Compared to the “standard” design of all-in-one
MonoBehaviourclasses, MV-C gains the crucial (to me) advantage of being testable. It also splits the logic (controller) from the data, input, and output (model-view) in an MVC-style “separation of concerns.”So I don’t consider MV-C as a replacement to MVC or that it’s superior in all cases, just as an alternative. You’d use it to solve different problems and it definitely wouldn’t be suited well to the “one model, many views” scenario.
#6 by Dogukan on November 6th, 2017 ·
How about having Model in a seperate class which is referenced by ModelView and having to store Transform value inside Model and directly Assigning it from ModelView? This way, if another view is interested in data of this class, it can be feeded with only the model class itself. Wouldn’t this solve the problem?
#7 by jackson on November 6th, 2017 ·
The central idea of MV-C is that Unity is already holding some of the “model”, such as the transform of the game object. By lumping the rest of the model into a model-view
MonoBehaviourattached to the game object, you can keep all of the model more-or-less in one place. Of course theGameObject,Transform, andMonoBehaviourare all actually separated, so the model-view is only held together by the usual bindings between these classes. So I think that MV-C already does what you suggest since the “model class” is essentially just theMonoBehaviourpart of the model-view.#8 by Jamppa on December 27th, 2016 ·
Hey. I figured finally writing to you since I been reading and learning from your MVC implementations for quite some time now. I began implementing my own version of MVC awhile ago when my boss who has a more traditional oop background wanted me to make the Unity code much more maintainable. So far I’ve had the best results by approaching it from Unity’s side of things (i am a Unity developer after all). I split the code between a View MB, Controller MB and a non-MB Model, where the View knows nothing of anything but only listens to input and forwards events to which Controller classes are listening and then I use a more Unity-esque Manager/Super-Controller that manages all of those, gamestates etc. The Model is there to serve as pure data representation that the Manager keeps updated and also holds static configurations from JSON etc. I try to make it so that the Manager can refresh Unity based on the Model – its alot of work but i think it gives a nice backbone to the project and makes JSON saving and loading a breeze, at least in the scope of what we are doing. What im trying to build is a large codebase that can run a Unity project without having to throw scripts around in the editor which i hate. One downside is that I have to use alot of AddComponent/GetComponent when adding functions to gameobjects in the form of mini-Controllers and ofcourse the Views, but abstracting these as much as possible has helped alot in that regard. English isnt my native language so i may have come across a little bit vague here, but anyway Ill be looking into this idea of yours more. I’d be happy to share some pseudo-code examples if your interested – I’m still learning this pure code stuff having always been throwing the damn components around and ending up in a big pile of wheres waldo in my projects. Anyways, great stuff!
#9 by jackson on December 28th, 2016 ·
Hi Jampaa, I’m glad you’re enjoying the articles and getting a chance to try out some of the MVC ideas. I’m interested in your “Super-Controller” and how it fits in with the usual model, view, and controller parts. Could you post a little example and/or elaborate?
PS: I like your description of finding scripts on game objects: “Where’s Waldo?” :)
#10 by Jamppa on January 2nd, 2017 ·
I actually went ahead and tried your MV-C approach more thoroughly and I think your Controller part is much better than the large MonoBehaviour thing/things I were going for. What I think I did was really not so much MVC rather than a code only version of Unity’s component approach with some MVC tendencies thrown in for maintainability. The Model classes would store data and object structures, the large Controller class would be the “Main” that reads the Model, puts everything in place and gives GameObjects View classes for functions and input listening and then surscribes to all of the events coming from those, and changes everything accordingly both in the application and the Model. (For example, the Model would have a data structure enemy class, the main large Controller class would spawn an enemy from the Models data, give it a Death class, surscribe to its Death event, destroy the gameobject upon death, tell the Model that this enemy was dead etc.)
But as I said, I’ve tried your MV-C out and it seems really beautiful, and I’ve already seen great rewards from it. The way the Model ties with the View is great, and the idea how every GameObject have their own non-mb Controller to perform logic is great. The Main needs to be there still of course but it just needs to set the stage, unlike my previous one. I think I’ll still continue on using Events though, as I’m far too in love with those. I’ll keep on studying though! Thanks again.
#11 by jackson on January 2nd, 2017 ·
Glad to hear you’re liking MV-C so far. Please let me know how the pattern works out for you, particularly how you think it might be improved. Thanks!
#12 by Valerie on January 10th, 2017 ·
Awesome JD. I just noticed the example project, which I’m downloading so that I can try testing with nsubstitute and unit. I’m not sure if you have an article on unit testing with Unity, but this will get me started. Thanks again!
#13 by Valerie on January 10th, 2017 ·
Jus found and read Part 1 & 2 of the Unity Unit testing article!
You’re awesome Jackson.
#14 by Romain on November 6th, 2017 ·
Hi Jackson,
Just wanted to thank you for all your articles, i’m still very much green (only made one spaghetti code game so far) and really wanted to improve on everything for my 2nd one. The MVC pattern had me shriek in horror, i didn’t feel confident about maintaining it, this MV-C one feels much more like something i can do.
You are not the easiest material to read for a beginner, but i am also for sure, not wasting my time here.
Thanks a lot !
#15 by jackson on November 7th, 2017 ·
Hey Romain, I’m glad you’re enjoying the articles. No worries if some of them are tough to grasp as a beginner. Most of the articles are for intermediate to advanced programmers. Best of luck with MV-C and your second game!
#16 by splinefx on July 28th, 2018 ·
Hi Jackson, thank you for your work!
Currently I’m a very beginner. I did some small projects in Unity; but that was a long time ago. Now I’m trying to make my first serious (well, more or less) game. I’m working on understanding basics of an architecture. I really love the idea of events and code separation (I did it in my previous projects, just without implementing some specific pattern).
But I can’t understand how your MV-C pattern will work with multiple instances? For example, if we have multiple enemies in the scene. Where do we have to store our Model-View and Controller scripts? Well, the first one is obvious I think, we provide this code with the prefab itself. As for Controllers… Is it some main GameObject that stores all the Controller scripts?
Despite all the advantages your pattern can offer, I like to store all object-related data with the object itself, in a prefab. Can we have Controller script attached to the same object with Model-View script? And if we have e.g. several enemies, how these controllers will know which model-view generates which events? Won’t it all be messed up? I have two possible solutions in mind.
1. MV and C scripts are attached to the same object and stored as prefab. In Controller script, we create a reference to MV script and somehow read events just from there. I’m not really happy with this solution.
2. EnemyController script placed on just one GameObject somewhere in the scene. We create custom event that stores some unique enemy ID so Enemy Controller can identify which enemy triggers this particular event and do some stuff that will affect only this particular enemy somehow.
Do I have the right point just somewhere here? :D
#17 by jackson on July 28th, 2018 ·
It’s important to remember that the Controller in MV-C isn’t a Unity
Component. This means it can’t be attached to aGameObjectlike you do with the Model-View, which is aMonoBehaviour. Some code needs to instantiate the Controller, such as with theTestScript(runtime) orTestEnemyController(unit test) in the article.Exactly where you put this Controller creation code is up to you and not specified by the MV-C pattern. You could have something like
TestScriptthat builds your Model-View and Controller objects such as when loading a scene as is done in the article.Alternatively, you could have one “boot”
MonoBehaviourlikeTestScriptthat just makes one “world” or “game” or “match” Model-View and Controller when the app starts up and then all other Model-Views and Controllers are created directly or indirectly by this “world” Controller. For example,BootScriptcould create aPlayerControllerwhich creates aBowControllerwhich creates anArrowControllerwhen the player shoots.Though it arguably couples the Model-View and Controller a bit, you could even have the Model-View itself create its Controller, perhaps if a
boolflag is set on a field, during a message function likeAwake.The point is that MV-C is flexible in this regard, so you get to choose where you want to put the code that creates the Model-View and Controller objects.